How to remove quickly your USB Flash Drive without using Safe Removal
The most indicate method, in Windows OS, to remove a USB Flash Drive is to use an option named “Safely Remove Hardware”. In an era of speed, where time is money and everything should move faster and faster, we all know that sometimes it’s really annoying and dully to do that. So, I did a research on this subject and I discovered an easy and a practical solution, which I’ll expose to you step-by-step, in this tutorial, making you to gain more time and, in the same time, to protect your USB Flash Drive from damages. Now, it will be possible to remove quickly the usb from your computer without “Safely Remove”. So, here we go!
In the next, I will start to present you how to make this dream possible, easy and fast. First of all, let’s find out if the USB flash drive of our computer is turned on.
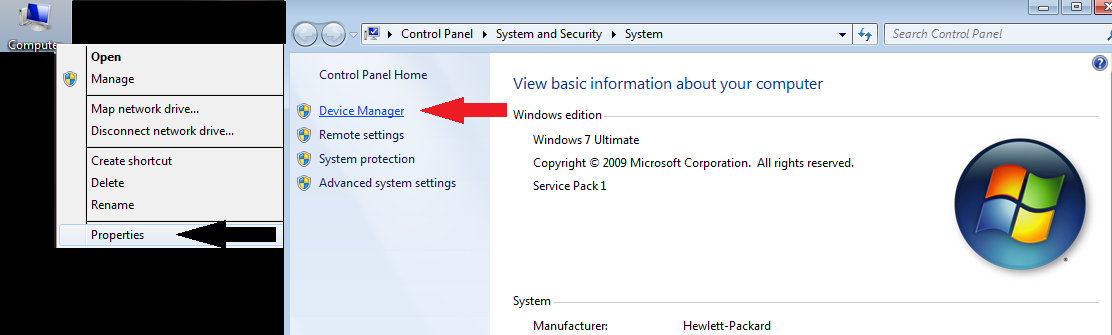
- Insert the USB flash drive in the computer. Might take some seconds, after that it should appear the Autoplay window. If it appears everything is fine, and that means our USB is turned on, works properly and we can go to the next step. Now, the next think we need to do is to open the Device Manager. So, go on the Desktop where you should find (My)Computer’s icon (if you dont have it there, you can find it in the Start Menu bar), right-click on it and then click on Properties option from the following drop-down menu. Now, it will open a new window called Properties. On the left side of it, there is an option – more exactly, the first one – named Device Manager. Just click on it and you will be able to see the Device Manager window.
 (click on the picture if you want to see it better)
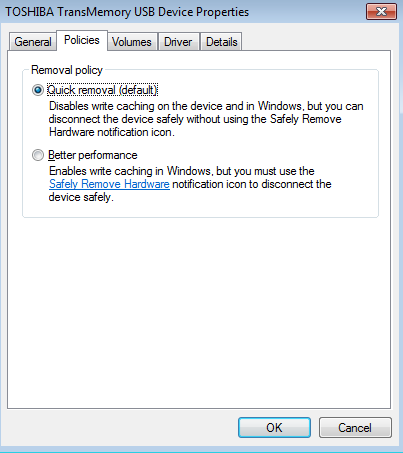
- As you can see in the picture below, you should scroll down the list until you find your own USB flash drive. The name of my USB is TOSHIBA TransMemory USB Device, but yours, most probably, will have a different specific name.
 (click on the picture if you want to see it better)
- After you find out your USB name, the next and the last step to transform our little dream in reality is to go on the Policies tab, as you can see in my below picture, and be sure that you have selected Quick removal (default) – Disable write caching on the device and in Windows, but you can disconnect the device safely without using the Safely Remove Hardware notification icon.
 (click on the picture if you want to see it better)
After you will do this step-by-step tutorial, you will protect better your personal data of your USB, and you no longer have to wait and loose time by doing things that our computer can do, better and faster than us, like: 1) clicking on the Safely Remove Hardware and Eject Media, 2) to search for our USB flash drive and 3) then, select Safely Remove from our computer,4) and finnaly remove quickly the USB from the computer.
“You may delay, but time will not.” ![]()
thanks