Remote Control And Transfer Files Between An Android Device And A Computer using a USB cable
Even if we refer to a Phone, even if we refer to a Tablet , if you ever doubted about the fact that the Android’s screen can’t appear, in the same time, on your personal computer’s desktop, find out now that this is possible! That’s not even all of it. You can also have the permission to remote control it. All you need is a computer with keyboard and mouse. To understand how to do it and the principle of functioning, I will write down here an easy step-by-step tutorial for everyone. Even if you are a beginner, you can make your dream come true.
If you don’t have yet any reason to do this, I will give you some to understand why it’s an advantage to be able to access your phone. First of al, after you will do all the steps of this tutorial, you will gain access to see the Android’s screen on your desktop computer. Why would you want this? Because you can easily manage your notifications. You may also take screenshots and screencasts. On the other hand, if your phone is already rooted (this is a big advantage for every Android user and it gives you a lot of possibilities to control just as you want your phone) you could use, undoubtedly, the keyboard and the mouse of your computer on your own Android phone. Doing this, it permits you a quickly movement for writing codes and controlling the device.
So, let’s start!
What we need:
- Android Phone
- USB data cable
- Download the Android SDK (download the app from the first link that appears after you write down on google: download the Android SDK)
- Download the App Java-based AndroidScreencast (download the app from the first link that appears after you write down on google: download androidscreencast)
- Download Java and install it in your computer ( download Java from the official site, or write down on google: download java)
How to configure the Android SDK

On our first step, we will configure the Android SDK. We advise you to skip the Windows installer, because you don’t need to install all the SDK pack and extra pack. Those stuff are made only for Android professional development, so we can jump this unnecessary installing kits.
Extract from the folder android-sdk-windows the archive, after you have downloaded it. Now, you may Launch the SDK Manager.exe, after you have enter in the folder. On the following, windows should updating the SDK pack for the new versions of it, because the archive don’t come with all apps we will use. I will put a image below to see the way it should look like:

Because you don’t have time to waste, due to fact the time is one of the most important values, check just the Android SDK Platform-Tools. All the other tools are not important for our tutorial and we don’t need them, not at all . Our time and the space on hard disk are more important. ![]() You will close the Android Manager, after the download has finished.
You will close the Android Manager, after the download has finished.
Connect your Android Device to your PC
Now it’s the time to connect your USB sync cable between your Android Device and your personal computer. Look into the folder android-sdk-windows and search for platform-tools. If you find it, everything’s cool, and the installation ended with success. Either, you have to reinstall the Android SDK Platform-tools, that you have already downloaded before.
The next step is to search for the app named adb.exe, in the main directory. So, all you have to do now is to open the cmd (command prompt - press in the same time the windows button<<the button with 4 windows>> and “R”. It will open Run. Now you need to type there “cmd” and press enter). It will open the cmd window. Now drag and drop there the adb.exe. After you drag an drop it, further, in continue, write down devices as you may see on the following image:
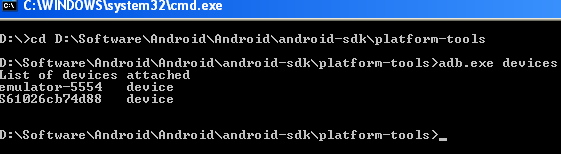
As you may see in the image above, it is shown a list of the devices that already you have attached.
Connection Between Your Android Device and Your PC via AndroidScreencast
Now we need to grab the copy of the file androidscreencast.jnlp, that we saved before and copy it on our folder named android-sdk-windows. It’s not a rule to be in this directory, but it’s a way to work organised with our files. All we have to do now is to double click on this file. It will open a Java loading window as you may see on the image below. It may take some time, so just be patient. If some errors occur, just double check the adb.exe devices. In the end, you may watch the Android Device screen.

Now, if you have a non-rooted device, you just may see the screen, record some videos of your screen, even to get some screenshot using screencasting tools. But if you have a rooted phone, you do a lot more stuff. You can click on the screen, and browse through your entire device. You can, even, to write down messages on your keyboard.
Now if you want remotely to watch the screen or even to control your device, all you have to do is just plug in the USB sync cable in your PC and in your Android Device, and after that all you have to do is to double click on androidscreencast.jnlp. That easy. ![]()
Recent Comments