Create a Bootable DOS USB Drive
Yes, DOS, you read it well. ![]() Even if DOS is not as it was back in the days you can still find it useful for many things. Even if you didn’t worked too much with DOS, it’s used many times for BIOS UPDATES and many.
Even if DOS is not as it was back in the days you can still find it useful for many things. Even if you didn’t worked too much with DOS, it’s used many times for BIOS UPDATES and many.
DOS stand for Disk Operating System and by disk it refer to floppy disk. But what can we do if we don’t find any floppy disk unit in our computer?
Start Rufus
Main format utility embedded in Windows won’t allow you to format using this option “Create MS-DOS startup disk” when you try to format a USB drive. But we can use Rufus for this operation. Rufus includes FreeDOS, which is mainly the same thing as DOS. First download the RUFUS program. It’s completely free and fast. When the program is started you won’t have to install anything.
Making a bootable USB drive with DOS:
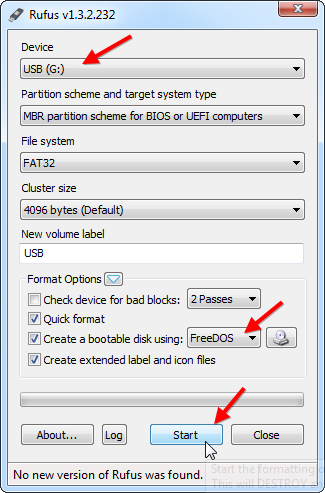
- First connect your USB drive. Select the newly inserted device from the Rufus Device list.
- Make sure that the “Create a bootable disk using” is checked and FreeDOS option is selected as you can see in the attached picture.
- This step will erase any content that you may have on the USB Drive. If you do have any important things, please make a backup. If you already did that, just click the Start button.
Well the “hard part” is over, the entire process will take only a couple of seconds.
Copy Your Files
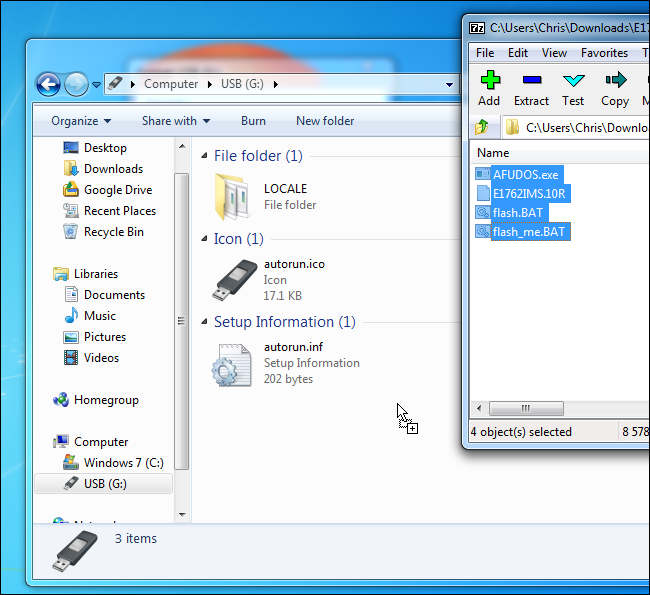
If you’ve created the USB drive to start a DOS based software like a BIOS updater or any other low-level system utility, make sure you follow this part. To run the files from DOS, you will have to actually copy those files to the USB Drive. If you have any BIOS update utilities, copy the BIOS.BIN and FLASHBIOS.BAT required to perform a BIOS update from the DOS environment. Simply copy these files to the root directory after formatting.
It’s time to BOOT into DOS.
To boot into DOS mode, you have to restart your computer keeping the USB Drive connected to your computer. Select the device you want to boot from, when the computer is in the boot sequence. When the computer will be in DOS mode you can start the program that was previously copied in the root of your USB drive. If the instructions is provided along with the files, just follow the instructions and get the job done. Tea time, you really deserve it.


the free dos is not a option.
It worked perfectly. Took all of 5 minutes. Thank you so much.
choose fat32
Ripped from HowToGeek, this method is totally bogus and does NOT work. Once you insert a USB stick the FreeDOS option automatically changes to “ISO Image” with the other being “DD Image”, thats it. No creating a bootable USB stick for DOS here.
Ripped or not, this method using rufus or other similar flashing tool is as old as the sun. User error detected!
PS: successful on Windows 10 64bit
I got an error with Rufus 2.11. What version did you use? The error log states that it can’t find the command.com file to copy to the USB drive.
Worked fine for me on Win 7 P, thanks!
it is normal that the folder contains 19 files ega.cpx locale?
three applications: KEYB, keyboard.sys and mode.
four files of keyboard system?
USB MS-DOS boot?
help!!!
Hi,
It does not work for me. I tried several times changing the bios setting no success.
YM: Yes creating a bootable USB stick for DOS here.
hoping its the fix for a sony vaio that doesnt ru proper…
i learning dos bootable..
Works like a charm. Don’t use a hub to boot from. Ran Western Digital Data Lifeguard that simply never finished in Windows.
totally fake
This tutorial doesn’t help in creating a live FreeDos USB.
Can u make one such tutorial.
Worked brilliantly if you follow the instruction on this and the Rufus website! Thank you so much.
There are no real files on the USB after this. Just a locale folder, autorun.inf, and autorun.ico. It does not boot!
And the MS-DOS option can never write its files to the USB drive.